This is the reason why today I decided to clarify a bit ‘ideas and explain how to use Virtual DJ, so we will see in detail all the menus and options necessary to take advantage of the main functions of the program. Ah, I almost forgot, Virtual DJ is available in a completely free version that you can freely use to practice and give vent to your musical creativity. That’s how.
To learn how to use Virtual DJ, the first step you need to take is to connect to the Virtual DJ website and click on Download now to download the program on your PC. When the download is complete open, double clicking on it, the file you just downloaded and, in the window that opens, click first on Yes and then on Next.
Accept then the conditions of use of the program, putting the check mark next to the entry I accept the terms in the License Agreement, and click first on Next and then on Typical, Next, Install and Finish to finish the installation process and start Virtual DJ. If you do not want to install additional browser toolbar and do not want to change the home page of your favorite navigation program, remove the check marks from the Install the Virtual DJ Toolbar and Set my home page to Ask.com.
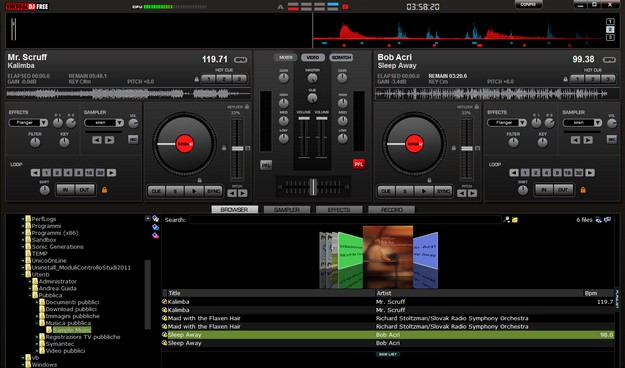
In the window that opens, click on the Skip button to skip the registration step on the Virtual DJ site and access the main program screen. The main screen should be very familiar to you, as it closely resembles the features of a real DJ console.
To learn how to use Virtual DJ, analyze it down to the smallest detail and start loading the first two tracks you want to mix. As? Using the box located at the bottom of the window (BROWSER) to navigate to the folder where the music tracks to be used in Virtual DJ are saved and dragging them with the mouse in the two vinyls located at the top left and top right.
At this point, use the equalizer located at the top center to adjust the various playback parameters of the songs (HIGH, GAIN, etc.) bearing in mind that the knobs on the right refer to the song loaded in the right vinyl, the knobs on the left are referred to the song loaded in the left vinyl, while the commands in the center regard the reproduction of the final mix between the two songs, and uses the two players placed left and right to start or stop the playback of the selected songs.
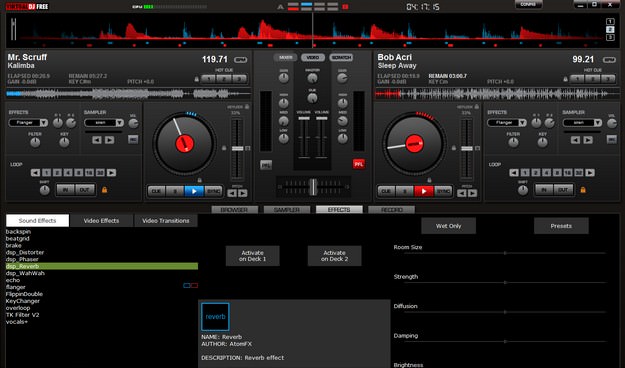
To ” scratch ” one of the two tracks during playback, select the vinyl related to it with the mouse and move the pointer back and forth, while to apply special effects to one of the two tracks click on the EFFECTS button (in the middle), select one of the effects available in the list located on the left and click on Activate on Deck 1 or on Activate on Deck 2 depending on whether you want to apply the effect on the first or second track. Furthermore, by clicking on the SAMPLER button you can create audio samples to be used during your mixes.
When you are familiar with the Virtual DJ interface and you are ready to record your first mixed song, click on the RECORD button and, after configuring the quality of the output by clicking on CONFIG., Click on the START RECORDING button to start the register your mix and choose the folder in which to save the mp3 file to get.
At the end of the mix, click on STOP RECORDING to finish the recording of the song. If you want, you can also record your mix as an audio CD (image file) by clicking on the BURN CD button before starting the recording of the song. The image file will then be burned to an empty CD with any program suitable for the purpose. Good fun!

